Tuesday, April 9, 2013
How I learned to stop worrying and love the Helldrake
You can’t hunt what you can’t kill. Pretty simple concept really, if your opponent can’t do any damage to your unit – you are free to do what you want. What are we talking about? Why the Helldrake of course! Everyone’s favorite barbeque and vector strike specialist custom made for taking out 3+ armor and almost anything else that gets in his way. Previously I talked about the effect this little guy has had on the game and not over reacting and reminding everyone that there aren’t 3 Helldrakes waiting for you around each corner. Now, let’s talk about some of the tools we have that we can use against this marine killing machine.
Labels:
Flyers,
Helldrake,
Space Marines,
Tactics,
Warhammer 40k
Tuesday, April 2, 2013
Helldrake Stage 5: Acceptance
Let start out by saying this is not a rant about how
Helldrake is broken, how it ruins the game, or how I crapped my pants and
learned to like it when I see that God Forsaken critter on the other side of
the table. If you are still anywhere in stages one through four, skip this
article and move on to another author who might be in one of the same stages of
Denial, Anger, Bargaining or Depression as yourself. Those of us here have
already moved on to Acceptance and are quietly plotting the death of our
enemies and ways to neutralize them.
Labels:
Helldrake,
Space Marines,
Tactics,
Warhammer 40k
Monday, March 4, 2013
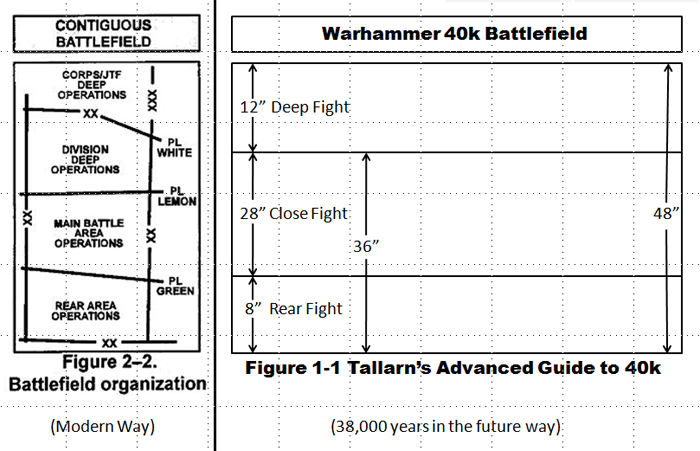
40k Tactics - Defining the Battlespace
In 1984 NATO adopted a doctrine of battle known of as ‘Air
Land Battle’. This doctrine divided the battle space up into a three parts -
the Rear Area, the Main Battle Area and the Deep Operations. Generally
speaking, different elements in the force were given responsibility for
separate areas with clear boundaries on those areas. The areas given to
specific units generally fit the capabilities and limitations of the forces assigned
to those areas. For example a B-52 would have responsibility for targets in the
Deep Operations area because of its ability to deliver large amounts of highly
explosive ordnance from the relative safety of high altitude but its inability
to actually hold any ground. An Infantry Company or Tank Platoon would be given
responsibility in the Main Battle Area due to their relatively short range,
compared to the aforementioned B-52, and their ability to take and hold ground,
which the B-52 lacks. Artillery with its longer range and high damage potential
but relatively low survivability, compared to the Infantry and Tanks, is more
suited to the Rear Area where it can support the Main Battle Area with relative
safety.
Now, I know that right now you are doing one of two things.
You are either:
A)
Wondering who in the hell cares about all this mumbo
jumbo.
B)
Already categorizing units in your army based on
the above criteria.
Monday, February 25, 2013
Target Priorities in 6th Edition
Recently I got in a game against one of my friends who is preparing
a list for a national tournament soon. He told me to bring a no-holds barred
list because he wanted a good test for the army he was looking at taking. Happily
I obliged with my usual Drop Wolves with a squad of Stern Guard in a pod as
well. After the dust settled we totaled up the points and I managed to pull out
the victory despite loosing all the Sternguard – opps! We can get into speed
bump units, multiple Troop choices or even the merits of Drop Pods some other
day. What we are really here to discuss is target priority – because at the end
of the game my friend was puzzled with me as to why I was shooting what I was
shooting with what I was shooting them with!
Labels:
Battle Report,
Space Wolves,
Tactics,
Target Priority
Subscribe to:
Posts (Atom)