
When it comes to modeling and creating custom pieces for your army, 50% of the battle will be decided before you even pick up a hobby knife, glue, green stuff or a sculpting tool. Selecting the right model is often times the difference between conversions that look great on the table; or a conversion that never quite lives up to what you, or anyone else, had envisioned for it. When selecting which mini you will use for the basis of your conversion there are many important factors to consider, none the least of which is the material involved and the modifications you plan for it.
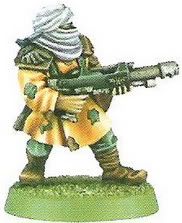
Take the following example: the Imperial Guard line of Tallarn miniatures never included a flamer trooper, a fact that was never all that horrible until 5th edition. Now flamers are the new black and everyone needs at least 40 of them in their armies. So we need to convert one of our extra Tallarn troopers into a suitable mini to represent a flamer. Presented below are 3 of the available Tallarn mini’s that could be converted into a flamer.

Option one would allow us to easily trim the lasgun barrels off while retaining the hands and would also allow us to easily connect the fuel line to the bottom of the lasgun between the grip and front hand. However, bringing the flamer fuel line underneath the outstretched hand with draping tunic in order to reach the backpack will be difficult and might require an extension of the fuel line, with either an new line or green stuff.
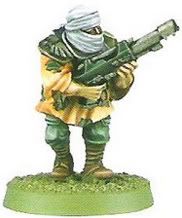
Option two allows the same easy nozzle and fuel line attachments as the previous option while the lack of any tunic sag at the arm will allow the fuel line to pass under and to the backpack easily.
Option three will allow the easy attachment of the nozzle to the lasgun but the fuel line attachment will be difficult due to the short distance between the grip and front hand. The angle of fuel line attachment will also require a longer fuel line in order to reach the backpack which will require custom fabrication like option one.
In the end I chose to use option two and here are the modifications that were required:
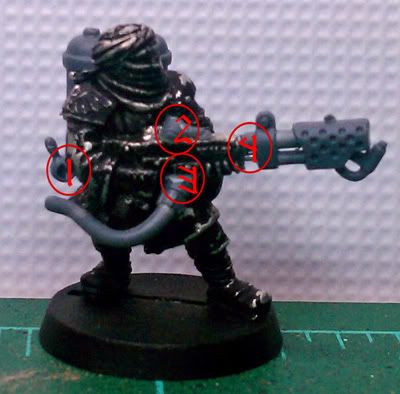
Section 1: With minimal modifications the backpack glued into place quite easily and without removing any of the metal parts of the mini, the fuel line was not attached to the backpack during coversion to allow for painting underneath.
Section 2: Used a hobby knife to shave off the upper portion of the lasgun and create a ‘flat top’ in order to attach the small plastic fuel line from the side of the plastic flamer. Not pictured here is the changing of the imperial eagle, it was shaved off and an eagle from a plastic lasgun was thinly sliced from a lasgun and put in its place. (the plastic one is more defined than the original metal one and looks better)
Section 3: Fuel line was attached with a pin to hold it into place. The fuel line connection was carefully shaved down on the sides to fit perfectly between the hand and grip. (the reason the ‘3’ looks so weird is I was working on some banners with photoshop when I last used it, and *poof* you get the Runic font I was playing with)
Section 4: Metal snips took off the lasgun barrels and the nozzle section attached. Note that the bottom line on the nozzle attachment is the actually pin used to hold it in place, it was the correct diameter (slightly smaller than the upper line) and looked great once in place, huzzah for awesome uses of paperclips.
Here is the picture without red circles all over the place now that the modifications are explained.
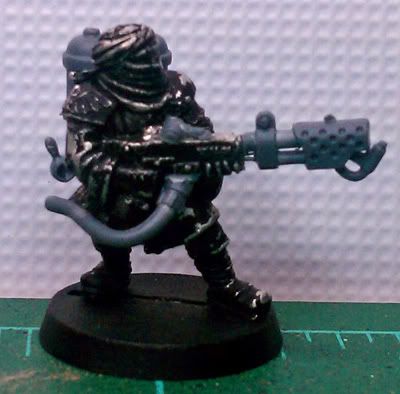
And after paint the finished product:


Simple and easy conversion that required no large changes to the miniature, which would have been difficult due to the fact that it is a metal miniature, no large uses of green stuff and no sculpting of new parts. What could have been a difficult and frustrating conversion for even a veteran hobbyist is easily accomplished by a new member of the gaming community by simply choosing the right mini from which to begin.
Cheers,
Tallarn
Cheers,
Tallarn
Great conversion and good principle.
ReplyDelete